Content creation is moving at a breakneck speed. To keep up with algorithm demands across platforms like TikTok, Instagram, and YouTube, creators and marketers are expected to publish high-quality video content almost daily. Traditional production pipelines simply cannot match this pace without burning out teams or exhausting budgets. The solution lies in mastering AI-driven video workflows. However, the secret to success isn’t just using AI; it’s knowing how to control it.
For creators looking to streamline their production while maintaining high visual standards, mastering Seedance 2.1 is becoming an essential skill. This platform represents the current frontier of multimodal video generation, allowing users to craft highly specific, visually stunning clips in a matter of minutes. If you want to stop guessing with your AI prompts and start directing your content intentionally, here is a comprehensive guide to getting the best results.
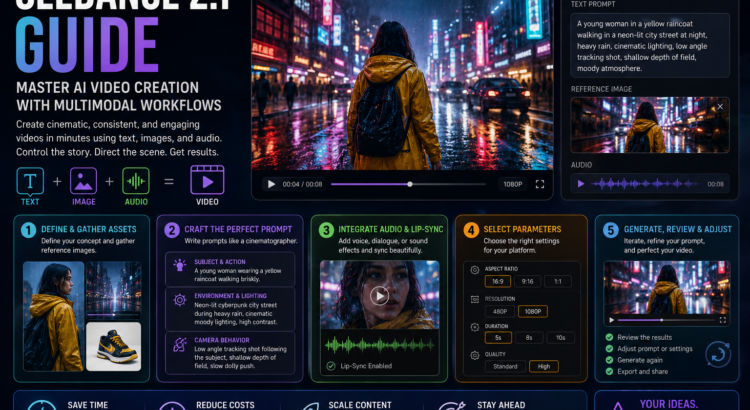
Understanding the Multimodal Advantage Before diving into the workflow, it is crucial to understand what “multimodal” means in the context of AI generation. Early AI tools were strictly text-to-video. You typed a sentence, and the AI did its best to interpret it. Multimodal systems, however, accept multiple types of input simultaneously—namely, text, images, and audio.
This is the key to consistency. If you are running an ad campaign for a specific shoe, a text prompt might generate a shoe that looks similar, but not exact. By uploading a reference image of the shoe and pairing it with a text prompt describing the environment and camera movement, you lock in the subject identity. The AI uses the image as the anchor and the text as the director.
Step 1: Define the Core Theme and Gather Assets The first step in your workflow should always happen before you even open the software. Define the core theme of your video. Are you creating an educational explainer, a short drama scene, or a product showcase? Once you have the concept, gather your reference assets. If you have a character or a product that needs to remain consistent, make sure you have clear, high-quality images to upload.
Step 2: Crafting the Perfect Prompt Once you are inside the AI video generator, it is time to write your prompt. The biggest mistake beginners make is writing prompts like “a man walking in a city.” To get professional results, you must write like a cinematographer.
Break your prompt down into three distinct sections:
- Subject and Action: Describe the subject in detail and what they are doing. (e.g., “A young woman wearing a yellow raincoat walking briskly.”)
- Environment and Lighting: Set the scene and the mood. (e.g., “Neon-lit cyberpunk city street during a heavy rainstorm, cinematic moody lighting, high contrast.”)
- Camera Behavior: Tell the AI how to film the scene. (e.g., “Low angle tracking shot following the subject, shallow depth of field, slow dolly push.”)
Step 3: Integrating Audio and Lip-Sync One of the standout features of this generation model is its ability to handle audio natively. You no longer have to build silent movies. When setting up your generation parameters, consider the auditory experience. If your video requires a voiceover or a character speaking, use the lip-sync features to align the generated motion with the dialogue. If it is an atmospheric shot, prompt the system for synchronized sound effects—like the sound of rain hitting the pavement or distant traffic. Keeping your audio intent aligned with your visual prompt ensures a cohesive final product.
Step 4: Selecting the Right Parameters Before hitting generate, double-check your technical settings. Are you posting this on YouTube or TikTok? Select the appropriate aspect ratio—16:9 for landscape, 9:16 for portrait, or 1:1 for standard social feeds. If you are just testing a concept, generate the clip in 480p to save credits and time. Once you have a prompt that produces the exact movement and lighting you want, you can upscale the final render to a crisp 1080p.
Step 5: Generate, Review, and Adjust AI generation is an iterative process. Rarely will the very first generation be a masterpiece. Review the clip carefully. Did the camera move too fast? Adjust the prompt to say “slow, deliberate dolly push.” Did the lighting change too drastically? Add words like “consistent, even lighting.” By treating the AI as an assistant that needs clear, continuous feedback, you will rapidly improve the quality of your outputs.
Conclusion Mastering AI video creation is no longer optional for serious marketers and content creators; it is a necessity. By utilizing multimodal inputs, commanding camera movements, and integrating native audio, you can produce agency-quality content at a fraction of the cost and time. The learning curve may seem steep initially, but by following a structured workflow, you can turn your creative ideas into compelling video realities with unprecedented ease.
Author
Related Posts

After Legacy Reborn, SWTOR’s Real Future Might Be Ryloth
Before SWTOR Launched, Blood of the Empire Made the Sith Empire Feel Dangerous
SWTOR’s Legacy Reborn Trailer Is Late, But It Still Makes the Sith Finale Look Dangerous
20 Years Ago, George Lucas Officially Became Science Fiction History

Shadows of the Empire Got a Sequel Before Star Wars Multimedia Was Normal
Captain Carson Teva Has Joined Galaxy of Heroes, and the New Republic Finally Has Its Space Cop
Super Star Wars: The Empire Strikes Back (1993): The Sequel That Made the SNES Trilogy Even Meaner
Before YouTube Guides, Star Wars: Episode I Racer Needed a Book