This guide explains the basic information needed to choose and fly a Galactic Starfighter ship. After reading, you should have a general idea of what to expect before you play, so you can learn to use the controls a little faster and easier. Even if you’ve been playing for awhile, you may still find some of the information useful.
We’ll start with a quick overview of the ships so you’ll have an idea of which one you would like to try first.
Galactic Starfighter Ships
The Scout, Strike Fighter, Gunships and Bombers are the four classes of ships available. You’ll find three ships listed under each class except for the gunships and you’ll start the game with two ships unlocked. As you play and earn Fleet Requisitions, you can unlock the remaining ships or you can buy them with Cartel Coins. You can view the components of any unlocked ship but only a brief description is available for the locked ones.
Below is a list of the scout ships along with a brief description of each one:
The Scout Ships
Scout ships are easy to maneuver and they’re the fastest class of ship available since their main function is to scout ahead and look for enemy ships. While their combat capabilities are somewhat limited, they are equipped with blaster cannons, rocket pods and boost ability.
The six Scout ships are as follows:
- Empire S-12 Blackbolt and Republic NovaDive Ships
- Empire S-13 Sting and Republic Flashfire Ships
- Empire IL-5 Ocula and Republic IL-5 Skybolt Ships
These ships handle and fly fast enough for an experienced pilot to get away from most enemy ships while avoiding fire, unless you’re caught off guard.
The Strike Fighters
These are the standard lock-on missile ships. There are two variations of Strike Fighters to choose from and they all allow you to swap the two primary weapons and the secondary weapons during battles. They don’t maneuver as well as the Scout ships and they’re not as fast but they are able to carry a good amount of firepower.
The Six Strike Fighters are as follows:
- Empire F-T6 Rycer and Republic FT-8 Star Guard- Both ships are default blaster ships and the primary weapons include Ion Cannons and Quad Lasers. Secondary weapons include Concussion and Cluster Missiles.
- Empire TZ-24 Gladiator and Republic TZ-24 Enforcer Blaster Ships- You’ll need 1,000 Cartel Coins to purchase either of these ships and they are identical to the Rycer and Star Guard ships.
- Empire F-T2 Quell and Republic FT-6 Pike Missile Ships – You’ll need 5000 fleet requisition to unlock these ships and both of them carry missiles.
Gunships
Originally a sniper ship, gunships carry long-range railguns with zoom mode and the two types of Gunships are the Empire GSS-3 Mangler and the Republic Quarrel Ship. They have long-range abilities and carry strong blasters that can destroy a fully loaded ship in 2 or 3 hits. You have two shield options called the Feedback and the Fortress Shield and these ships have rotational thrusters used to rotate the ship when you’re taking on enemy fire.
Bombers
Bombers will be available in February 2014 and they’ll include the following ships:
- Empire 4D Legion and Republic Warcarrier Ships- You’ll need 5,000 fleet requisitions to unlock both ships and they carry drone turret missiles.
- Empire M-7 Razorwire and Republic Rampart Mark Four Ships- You’ll need 2,500 fleet requisitions to unlock these and they carry mines.
You can learn more details about each of the ships listed above in the SWTOR Galactic Starfighter Overview Guide.
Ships Storage Hangar
To begin your journey you need to visit the ships storage hangar. You can do this by pressing the H key or you can click on the icon for the hangar located on the minimap to bring up the window for the Galactic Starfighters.
The hanger window has the following 5 sections:
- Ships– This is where you can access all of the ships to pick out the one you want to buy or modify. Use the “Select Your Ship button” to unlock the ship you want to take to battle.
- Cosmetics– Choose and use Cartel Coins to purchase paint color and other accessories that help make your Starfighers unique.
- Companions– The four new companions exclusive to the Galactic Starfighter ships are the default options for every player and they fill each of the following positions: Offensive, Tactical, Engineering and Defense. You will have to choose your Co-Pilot.
- Components– This is where you go to make upgrades to your ship.
- Launch– When you’re ready for a fight this takes you to both group and solo battles.
After choosing your ship, go to the Combat Training section under the PvP Terminal to complete the “Introduction to Starfighter” quest, receive 1,000 fleet requisitions and to choose your battles.
- Daily battles grant you 750 Ship Requisitions applied to all ships
- Weekly battles grant you 2,500 Ship Requisitions and 500 Fleet Requisitions applied to all ships
You’ll earn the appropriate amount of requisitions each time you complete a battle. The two types of requisitions are explained below:
- Fleet Requisition– These apply to every ship associated with your character and they’re mainly used to unlock new ships. However, you can use them to supplement ship requisition when purchasing component upgrades.
- Ship Requisition– These are awarded to the ship used in the battle and they cannot be transferred to any of your other ships. They’re mainly used for component upgrades but you can convert them to fleet requisition using Cartel Coins.
Look at the scoreboard under the Requisition Gain section each time you finish a match to see how many requisitions you earned. The ship requisition is the big number and the fleet requisition is the smaller number on the scoreboard. You can also look along the top half of the menu section to view your requisitions.
HUD Information and Combat Controls
Go to the right hand corner of the menu to access the tutorial that teaches you about the controls used in combat and the HUDs. You can practice flying around and capturing objectives before you actually engage in combat, so it can be beneficial to check it out before moving on. The basic information you need to know is as follows.
The Respawn HUD
This is where you’ll begin your battle when you zone into the match. When you’re ready to engage, simply click on the Ready button and when the timer counts down, you’ll spawn in your ship. You can also select your ship and keep an eye on the composition of your enemy and teammates from here. Anytime you die in a match, you’ll return to the respawn HUD.
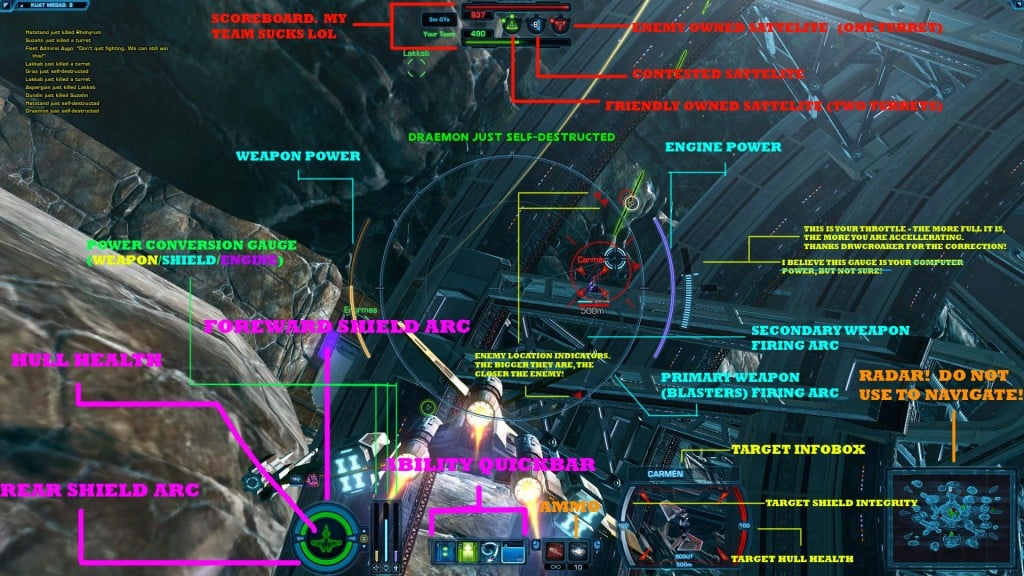
In the left corner you can chat with your friends and on the right side of the screen, you can view the 2D minimap with a small overlay grid. On the map, the green triangle is your ship, the green circles are your allies and the red circles are the enemy ships.
The scoreboard is located at the top and you’ll see three circles labeled A, B and C. These are your objectives and you can easily tell who has control by the color. Green circles mean your team controls them and red means they are controlled by the enemy. The 3 turrets are the dots that surround the circles and if they’re destroyed, the dot will disappear.
Firing Arcs
In the center of your screen in the middle of two curved bars that form a circle, you’ll find the firing arc. Use it to lock onto the enemy ships. The orange bar on the left shows your weapon power pool. The purple bar on the right is the engine power pool. The blue bar on the right side of the purple bar will give you your ships speed. Ships targeted outside your view appear as a light colored diamond shape and the red triangles located on the inside of the big circle, represents the enemy ships that are outside of your view.
Power Conversions and Health Bar
Look at the bottom of your HUD screen on the left and you’ll see your ships power conversions and health bar. The ship icon represents your hull and the rings surrounding it represent your shield with the top being your forward shield and the bottom being your back shield.
The colors tell you how much damage the shields and the hull have sustained. If the rings or the icon of the ship is green, you have 100 percent power. As you take on damage, they will turn yellow, orange and then red to warn you they’re almost depleted, in which case the rings or icon will disappear.
Debuffs are shown at the top of the display and the three bars found on the right are power conversions. These bars represent your Engine, Blaster and Shield power conversions. You can switch between them by using F1, F2 and F3.
- F1 is the weapon power conversion for blasters
- F2 is the shield power conversion
- F3 is the engine power conversion
Choosing the right conversions will mean the difference between winning and losing the battle. For this reason, you’ll need a strategy to use when engaging the enemy, so you’ll have some idea of how to respond when being attacked.
System Components
Located at the bottom of your HUD screen you’ll see 6 buttons (numbered 1 -6) that you’ll use to activate your system components. Numbers 1 through 4 connect to their counterparts on the keyboard and numbers 5 and 6 are connected to your mouse.
Left click for number 5, which is your blasters and right click for number 6 to lock on target and shoot missiles, rockets and railguns. While it can be different depending on the ship and its specific components, usually the first button will swap weapons on the strike fighters and the gunships. The second one activates the shield component ability, the third activates the engine component ability and the Co-Pilot companion ability is activated when you press four.
Weapons, Sensors and Shields
Scouts and Strike Fighters can find information about their targets by looking at the bottom right hand corner of the target window. Here, you’ll see an image of the ship and the following information:
- Name of the targeted ship (at top)
- The type of ship
- Shield and hull HP
- Distance and direction the enemy ship is moving (at bottom)
When you target a ship, a circle and targeting grid appears. Aim your weapons at the circle to lock onto the target. Right click mouse to fire rocket pods on basic scouts where you don’t have to lock on.
The triangles on the enemy ship icons will glow a light reddish color when you reach missile range. When you see this, you can start locking onto the target. When the circle and grid turns red, you’re close enough to use your blasters.
The Gunships Railguns
Railguns use a view scope that closely resembles the sniper scopes you use when doing battle on the ground. You can access them by right clicking the mouse. They have the circular crosshairs that will turn red when your target is in range and the top bar tells you how much charge your gun has. Be careful when using the scope because you can only see straight in from of you and you don’t want the enemy ships sneaking up beside or behind you.
General Information
The following information is designed to help new players learn the basic shortcuts associated with fighting an enemy ship.
To target the ship ships, press:
- E- manually target the enemy
- R- target the enemy that just fired at you
- Tab- cycle through and target enemy ships in the vicinity
Starfighters use the WSAD control outlined below.
Press:
- D to roll right
- A to roll left
- W to accelerate
- S to slow down
- Shift+W to strafe upward
- Shift+S to strafe downward
- X to shut down engines
Holding down the spacebar allows you to use the afterburner and if you have the power, you’ll gain 320 percent speed boost.
Using the Camera
The camera works the same way as all others but you do need to learn the following information exclusive to Starfighter ships.
Press:
- C to turn your camera so you can find your target
- F to look around while your ship is sitting still
- Z to release the cursor from the camera so you can look at other information such as abilities
- Shift +Z to look up information without holding the Z key down
The SWTOR Galactic Starfighter Shield, Sensor and Armor Components Comparisons Guide will provide you with more information about these components.
Domination Game Mode
The Domination game mode requires the player to complete missions that involve taking control of and defending the objective. The team in control of an objective earns points and you can view the entire battlefield with your map to see where each one is located. Use the scoreboard to see who is dominating the objectives and devise a strategy with your teammates to take control from the enemy.
Don’t forget to check out constantly growing list of guides for Star Wars: The old republic

